Hiển thị các bài đăng có nhãn Java. Hiển thị tất cả bài đăng

Thứ Hai, 14 tháng 8, 2023

Cấu hình để cài đặt cuốn chiếu zero downtime (ZDD) với Netflix Eureka, Zuul, Ribbon ở tình trạng sẵn dùng được (High Availability)

Về mặt lý thuyết


Ta cần chú ý đến 3 cache ở các thành phần sau : 1 ở gateway Zuul - đóng vai cổng vào để nhận các truy vấn đến; 1 ở load balancer Ribbon - đóng vai trò tác nhân cân bằng tải để điều hướng các truy vấn đến những dịch vụ web trong hệ thống; 1 của service discovery Eureka - dịch vụ chủ Eureka lưu dữ và cập nhật danh sách các dịch vụ web có trong hệ thống bao gồm các microservices. Mặc định mỗi cache của từng thành phần này sẽ tự cập nhật mỗi 30 giây. Vậy nên phải chờ khoảng 30+30+30 = 90 giây để tất cả các cache được cập nhật ở mọi lớp này.

Ta xét trường hợp một hệ thống HA (high availability) gồm hai replicas - mỗi một replica bao gồm một tập hợp hoàn chỉnh các dịch vụ web cho phép hệ thống hoạt động bình thường. Trong trường hợp này ta có thể tiến hành việc cài đặt như sau : 

- Hủy đăng ký của tất cả các dịch vụ web trong instance đầu tiên của Eureka server (dùng enpoint pause của actuator hoặc Eureka API PUT OUT_OF_SERVICE)
- Đợi 90 giây.
- Dừng tất cả các service, rồi cài đặt lại chúng cho instance thứ nhất này.
- Đợi 90 giây.
- Hủy đăng ký của tất cả các dịch vụ web trong instance thứ hai của Eureka server (dùng enpoint pause của actuator hoặc Eureka API PUT OUT_OF_SERVICE)
- Đợi 90 giây.
- Dừng tất cả các service, rồi cài đặt lại chúng cho instance thứ hai này.
- sau khoảng 90 giây, các dịch vụ web của instance thứ hai sẽ hoạt động trở lại.

Ngoài ra, cần phải cài đặt retry cho gateway để tránh trường hợp một dịch vụ web có vấn đề thì truy vấn vẫn sẽ được thực hiện trong một dịch web tương đương khác có sẵn. 


Cài đặt


1. Cấu hình để mở các endpoints actuator /pause và /shutdown

Trong tập tin application.yml

management:
endpoint:
pause:
enabled: true
restart:
enabled: true
resume:
enabled: true
shutdown:
enabled: true

Ví dụ dùng các endpoints này như sau :

$ curl -X POST http://localhost:1234/actuator/pause
$ curl -X POST http://localhost:1234/actuator/shutdown

2. Cài đặt retry

Trong tập tin pom.xml thêm Spring Retry vào dự án như sau :


        <!-- enable retry for non-reactive version (load-balanced RestTemplate) -->
        <dependency>
            <groupId>org.springframework.retry</groupId>
            <artifactId>spring-retry</artifactId>
        </dependency>

 Trong tập tin cấu hình application.xml của zuul, ta cần kích hoạt loadbalancer và retry như sau :

spring:
  cloud:
    # enable retry for reactive version (with WebClient)
    loadbalancer:
      retry:
        enabled: true
      ribbon:
        enabled: true

zuul:
  retryable: true

ribbon:
  OkToRetryOnAllOperations: true
  MaxAutoRetries: 3
  MaxAutoRetriesNextServer: 3
  # 500 (Internal Server Error), 503 (Service Unavailable), 408 (Request Timeout)
  retryableStatusCodes: 500, 503, 408


 Trong các tập tin cấu hình application.xml của các services, ta cần cấu hình cho retry như sau :

ribbon:
  OkToRetryOnAllOperations: true
  MaxAutoRetries: 3
  MaxAutoRetriesNextServer: 3
  # 500 (Internal Server Error), 503 (Service Unavailable), 408 (Request Timeout)
  retryableStatusCodes: 500, 503, 408


Xem thêm tại đây

https://openspacevn.blogspot.com/2023/07/cau-hinh-e-dung-auto-retry-cho-spring.html


3. Cài đặt cho các instance của HA

a. Cài đặt chung cho các instance trong tập tin application.xml

eureka:
instance:
prefer-ip-address: true
# Indicates the interval of heartbeats that the client sends to the server, in seconds (The default value is 30 seconds)
lease-renewal-interval-in-seconds: 1
# The time in seconds that the Eureka server waits since it received the last heartbeat from a client before it can remove that client from its registry (the default value is 90 seconds)
lease-expiration-duration-in-seconds: 1
client:
fetch-registry: true
register-with-eureka: true
healthcheck:
enabled: true
server:
# This property tells the Eureka server to run a job at this frequency to evict the expired clients. (the default value is 60 seconds)
eviction-interval-timer-in-ms: 1000
enableSelfPreservation: false


ribbon:
# in second
NFLoadBalancerPingInterval: 1
# in millisecond
ServerListRefreshInterval: 1000


server:
shutdown: graceful

spring:
lifecycle:
timeout-per-shutdown-phase: 2m


b. Cài đặt cho instance 1 trong tập tin application_ha_1.xml

eureka:
client:
service-url:
defaultZone: http://${app1.address.ip}:8761/eureka/,http://${app2.address.ip}:8761/eureka/
preferSameZoneEureka: true
transport:
applicationsResolverUseIp: true
instance:
metadata-map:
zone: zone1


c. Cài đặt cho instance 2 trong tập tin application_ha_2.xml


eureka:
client:
service-url:
defaultZone: http://${app2.address.ip}:8761/eureka/,http://${app1.address.ip}:8761/eureka/
preferSameZoneEureka: true
transport:
applicationsResolverUseIp: true
instance:
metadata-map:
zone: zone2


d. Cấu hình cho từng server Eureka ở HA


eureka:
client:
fetch-registry: true
register-with-eureka: true


e. Dùng Eureka API để đặt dịch vụ web ở chế độ OUT_OF_SERVICE

Cú pháp :

PUT /eureka/apps/appId/instanceId/status?value=OUT_OF_SERVICE


Ví dụ :

curl -X PUT 
http://localhost:8761/eureka/apps/DEMO-SERVICE/demo-service:f42adf31bb76e181988fc292a1344be9/status?value=OUT_OF_SERVICE


Tham khảo


Ngoài ra có thể tham khảo thêm các properties trong class org.springframework.cloud.netflix.eureka.server.EurekaServerConfigBean

(chẳng hạn như : peerEurekaNodesUpdateIntervalMs, peerEurekaStatusRefreshTimeIntervalMs ...)


Các đường dẫn tham khảo :


https://www.credera.com/insights/zero-downtime-rolling-deployments-netflixs-eureka-zuul

https://cloud.spring.io/spring-cloud-netflix/2.0.x/multi/multi__service_discovery_eureka_clients.html

https://github.com/spring-cloud/spring-cloud-netflix/issues/1571

https://github.com/spring-projects/spring-boot/wiki/Spring-Boot-2.3-Release-Notes#graceful-shutdown

https://docs.spring.io/spring-boot/docs/current/reference/html/features.html#features.external-config.files.profile-specific


Thứ Hai, 3 tháng 7, 2023

Một số lệnh với keytool

 Dưới đây là một số lệnh với keytool


1. Thêm certificat vào keystore

$ sudo keytool -importcert -keystore <đường dẫn đến keystore> -storepass <mật khẩu của keystore> -alias <tên dùng đại diện cho certificat> -file <đường dận tới tập tin certificat>  -noprompt


 Ví dụ :

$ sudo keytool -importcert -keystore /opt/java/lib/security/cacerts -storepass changeit -alias toan-test -file /tmp/toan_certif.crt  -noprompt

$ sudo keytool -importcert -storetype PKCS12 -keystore /opt/truststore.p12 -file /tmp/test_cert.pem -alias test-alias


2. Trích xuất certificat từ keystore

$ keytool -exportcert -keystore <đường dẫn đến keystore> -storeType PKCS12 -alias <tên dùng đại diện cho certificat> -file <đường dận tới tập tin certificat trích xuất>


 Ví dụ :

$ keytool -exportcert -keystore /opt/keystore.p12 -storeType PKCS12 -alias test -file ./certificat_cert.pem


3. Liệt kê các certificat trong keystore

$ keytool -list -keystore <đường dẫn đến keystore>


 Ví dụ :

$ keytool -list -keystore /opt/java/lib/security/cacerts -storepass changeit | grep toan


4. Xóa một certificat bằng alias trong keystore

 
$ keytool -delete -alias <tên dùng đại diện cho certificat> -keystore <đường dẫn đến keystore>


Ví dụ: 


$ keytool -delete -alias toan-test -keystore /opt/truststore.p12


Ngoài lề :

Sao chép tập tin với lệnh scp (hoặc scp.exe trong git bash) certificat


$ scp <đường dẫn đến tập tin gốc để copy> <login>@<địa chỉ ip>:<đường dẫn tới vị trí đích để copy tới đó>


Ví dụ: 

$ scp ./toan_certificat.crt toan@10.10.11.11:/tmp/


Thứ Sáu, 21 tháng 4, 2023

Giới thiệu dùng thư viện JGit

 Thư viện JGit của Eclipse cho phép tương tác với một hệ thống Git quản lý mã nguồn. Ta thêm dependency của JGit vào tập tin pom.xml để xài thư viện này như sau :

		<dependency>
<groupId>org.eclipse.jgit</groupId>
<artifactId>org.eclipse.jgit</artifactId>
<version>6.5.0.202303070854-r</version>
</dependency>

Trong ví dụ dưới đây có dùng thư viện commons-io nên ta cũng thêm thư viện này vào tập tin pom.xml như sau :

		<dependency>
<groupId>commons-io</groupId>
<artifactId>commons-io</artifactId>
<version>2.11.0</version>
</dependency>

Dưới đây là một ví dụ xài thư viện JGit :


import org.apache.commons.io.FileUtils;
import org.eclipse.jgit.api.Git;
import org.eclipse.jgit.api.PushCommand;
import org.eclipse.jgit.api.errors.GitAPIException;
import org.eclipse.jgit.transport.RefSpec;
import org.eclipse.jgit.transport.UsernamePasswordCredentialsProvider;

import java.io.File;
import java.io.IOException;
import java.nio.file.Files;
import java.nio.file.Paths;
import java.nio.file.StandardCopyOption;
import java.time.LocalDateTime;
import java.time.format.DateTimeFormatter;
import java.util.Arrays;

public class GitBackUpFile {

public static void main(String[] args) {
File createdFile = new File("example.txt");
try {
Files.write(createdFile.toPath(), "File contents".getBytes());
System.out.println("file path : " + createdFile.getAbsolutePath());
backupInGit(createdFile.getAbsolutePath());
} catch (IOException e) {
throw new RuntimeException(e);
}
}

private static void backupInGit(String sourceFileName) {
String branchName = "branch-local";
String gitDirectoryPath = "/path/to/repo" + File.separator + branchName;
File gitLocalDirectory = new File(gitDirectoryPath);
try {
FileUtils.deleteDirectory(gitLocalDirectory);
} catch (IOException e) {
System.out.println("Error deleting git local directory : " + e.getMessage());
}

if (!gitLocalDirectory.exists() && !gitLocalDirectory.mkdirs()) {
throw new RuntimeException("Error creating local git directory : " + gitDirectoryPath);
}

String branch = "refs/heads/" + branchName;
UsernamePasswordCredentialsProvider credentialsProvider = new UsernamePasswordCredentialsProvider("username", "password");
try (Git git = Git.cloneRepository().setURI("https://github.com/example-eclipse/jgit.git")
.setDirectory(gitLocalDirectory)
.setBranchesToClone(Arrays.asList(branch))
.setBranch(branch)
.setCredentialsProvider(credentialsProvider)
.call()) {

String fileName = "fileToPushIntoGit.txt";
String fileAbsolutePath = gitDirectoryPath + File.separator + fileName;
Files.copy(Paths.get(sourceFileName), Paths.get(fileAbsolutePath), StandardCopyOption.REPLACE_EXISTING);

LocalDateTime timeStamp = LocalDateTime.now();
DateTimeFormatter dateTimeFormatter = DateTimeFormatter.ofPattern("yyyy-MM-dd-HH");

git.add().addFilepattern(fileName).call();
git.commit().setMessage("Commit file " + fileName + " at " + timeStamp.format(dateTimeFormatter)).call();

PushCommand pushCommand = git.push();
pushCommand.setRemote("origin").setRefSpecs(new RefSpec(branch + ":" + branch));
pushCommand.setForce(true).setPushAll();
pushCommand.setCredentialsProvider(credentialsProvider);
pushCommand.call();

} catch (GitAPIException | IOException e) {
System.out.println("Error when backing up file to git" + e.getMessage());
}
}
}

Trong ví dụ trên ta tạo một tập tin example.txt và push nó vào một branch của depository git

Để có thể push tập tin này vào Git :
- Trước hết ta tạo một thư mục repository ở local để có thể clone repository từ depos Git về đây.
- Nếu đã có một repos git ở thư mục này từ trước rồi thì ta phải xóa nó đi, rồi tạo mới lại thư mục vì không khi clone sẽ báo lỗi.
- Tiếp theo ta clone về nhánh Git mà ta cần lưu tập tin vừa tạo.
- Sao chép tập tin cần lưu vào repos Git ở local này.
- Commit tập tin này vào repos local.
- Sau đó push nó vào repos ở xa.


Thứ Hai, 3 tháng 4, 2023

Zip file Java với mật khẩu dùng zip4j

 Thư viện java.util.zip của Java không cho phép dùng mật khẩu cho file zip, do đó ta có thể dùng thư viện zip4j

		<dependency>
			<groupId>net.lingala.zip4j</groupId>
			<artifactId>zip4j</artifactId>
			<version>2.11.5</version>
		</dependency>

Ví dụ về dùng thư viện này như sau :

import net.lingala.zip4j.io.outputstream.ZipOutputStream;
import net.lingala.zip4j.model.ZipParameters;
import net.lingala.zip4j.model.enums.EncryptionMethod;

import java.io.File;
import java.io.FileOutputStream;
import java.io.IOException;
import java.nio.charset.StandardCharsets;
import java.util.HashMap;
import java.util.Map;

public class ZipFiles {
    public static void main(String[] args) {
        // zip single file
        zipSingleFile("singleFile.zip", "toan".toCharArray(), "file.txt", "test zip single file");
        Map<String, String> filesMap = new HashMap<>();
        filesMap.put("File1.txt", "test 1");
        filesMap.put("File2.txt", "test 2");
        // many files zip
        zipFiles("manyFiles.zip", "toan".toCharArray(), filesMap);
    }

    private static ZipParameters getZipParameters() {
        ZipParameters zipParameters = new ZipParameters();
        zipParameters.setEncryptFiles(true);
        zipParameters.setEncryptionMethod(EncryptionMethod.AES);
        return zipParameters;
    }

    private static void zipFileEntry(ZipOutputStream zos, String fileName, String fileContent)
            throws IOException {
        ZipParameters zipParameters = getZipParameters();
        zipParameters.setFileNameInZip(fileName);
        zos.putNextEntry(zipParameters);

        byte[] data = fileContent.getBytes(StandardCharsets.UTF_8);
        zos.write(data, 0, data.length);
        zos.closeEntry();
    }

    private static void zipSingleFile(String zipFileName, char[] password, String fileName, String fileContent) {
        File file = new File(zipFileName);
        try (ZipOutputStream zos = new ZipOutputStream(new FileOutputStream(file), password)) {
            zipFileEntry(zos, fileName, fileContent);
            System.out.println("path : " + file.getAbsolutePath());
        } catch (IOException e) {
            System.out.println("error while zipping file " + zipFileName);
        }
    }

    private static void zipFiles(String zipFileName, char[] password, Map<String, String> filesMap) {
        File file = new File(zipFileName);
        try (ZipOutputStream zos = new ZipOutputStream(new FileOutputStream(file), password)) {
            for (Map.Entry<String, String> entry : filesMap.entrySet()) {
                zipFileEntry(zos, entry.getKey(), entry.getValue());
            }
            System.out.println("path : " + file.getAbsolutePath());
        } catch (IOException e) {
            System.out.println("error while zipping file " + zipFileName);
        }
    }
}


Thứ Hai, 5 tháng 10, 2020

Một số (fake/mock) server fpt, http dùng trong test

Đôi khi ta cần dùng các server ftp, http trong các test chẳng hạn trong unit test. Dưới đây giới thiệu một số server như thế

FakeFtpServer

http://mockftpserver.sourceforge.net/fakeftpserver-getting-started.html
Tải jar về tại đây : https://mvnrepository.com/artifact/org.mockftpserver/MockFtpServer/2.7.1
MockFtpServer-2.7.1.jar

FakeFtpServer  Rất dễ sử dụng để test như dưới đây

import org.mockftpserver.fake.FakeFtpServer;
import org.mockftpserver.fake.UserAccount;
import org.mockftpserver.fake.filesystem.DirectoryEntry;
import org.mockftpserver.fake.filesystem.FileSystem;
import org.mockftpserver.fake.filesystem.UnixFakeFileSystem;

public class FakeFtpServerUtil {
	private static FakeFtpServer fakeFtpServer;
	private static final String DEFAULT_HOME_DIR = "/test";
	private static final String DEFAULT_USER = "toan";
	private static final String DEFAULT_PASSWORD = "matkhau";
	private static final int DEFAULT_PORT = 21;

	public static void setUpFakeFtpServer() {
		fakeFtpServer = new FakeFtpServer();
        fakeFtpServer.setServerControlPort(DEFAULT_PORT);

        FileSystem fileSystem = new UnixFakeFileSystem();
        DirectoryEntry directoryEntry = new DirectoryEntry(DEFAULT_HOME_DIR);
		fileSystem.add(directoryEntry);
        fakeFtpServer.setFileSystem(fileSystem);

        UserAccount userAccount = new UserAccount(DEFAULT_USER, DEFAULT_PASSWORD, DEFAULT_HOME_DIR);
        fakeFtpServer.addUserAccount(userAccount);

        fakeFtpServer.start();
	}

	public static void shutdownFtpServer() {
		if (fakeFtpServer != null) {
			fakeFtpServer.stop();
			fakeFtpServer = null;
		}
	}

}

FakeFtpServer tuy rất tiện để dùng trong test nhưng có nhược điểm là dùng bộ nhớ trong cho hệ thống tập tin của server ftp, nên nếu ta muốn dùng một thư mục vật lý cho hệ thống lưu tập tin của server ftp thì Apache FtpServer là một lựa chọn tốt như trình bày dưới đây.


Apache FtpServer

https://mina.apache.org/ftpserver-project/embedding_ftpserver.html
 

Tải về tại đây
https://mvnrepository.com/artifact/org.apache.ftpserver/ftpserver-core/1.1.1
https://mvnrepository.com/artifact/org.apache.ftpserver/ftplet-api/1.1.1
https://mvnrepository.com/artifact/org.apache.mina/mina-core/2.1.4

import java.util.ArrayList;
import java.util.List;

import org.apache.ftpserver.FtpServer;
import org.apache.ftpserver.FtpServerFactory;
import org.apache.ftpserver.filesystem.nativefs.NativeFileSystemFactory;
import org.apache.ftpserver.ftplet.Authority;
import org.apache.ftpserver.ftplet.FileSystemView;
import org.apache.ftpserver.ftplet.FtpException;
import org.apache.ftpserver.ftplet.User;
import org.apache.ftpserver.ftplet.UserManager;
import org.apache.ftpserver.listener.ListenerFactory;
import org.apache.ftpserver.usermanager.PropertiesUserManagerFactory;
import org.apache.ftpserver.usermanager.impl.BaseUser;
import org.apache.ftpserver.usermanager.impl.WritePermission;
import org.apache.ftpserver.usermanager.impl.WriteRequest;

public class EmbeddedFtpServer {

	private static FtpServer ftpServer;
	
	public static void setUpFtpServer() throws FtpException {
		FtpServerFactory serverFactory = new FtpServerFactory();
		ListenerFactory factory = new ListenerFactory();
		
		factory.setPort(21);
//		NativeFileSystemFactory fsf = new NativeFileSystemFactory() {
//	        @Override
//	        public FileSystemView createFileSystemView(final User user) throws FtpException {
//	            final FileSystemView fsView = super.createFileSystemView(user);
//	            fsView.changeWorkingDirectory("/test");
//	            return fsView;
//	        }
//		};
//	    fsf.setCreateHome(true);
//	    serverFactory.setFileSystem(fsf);
	    
		// replace the default listener
		serverFactory.addListener("default", factory.createListener());
		
		// create user
		final PropertiesUserManagerFactory userManagerFactory = new PropertiesUserManagerFactory();
	    final UserManager userManager = userManagerFactory.createUserManager();
	    BaseUser user = new BaseUser();
	    user.setName("toan");
	    user.setPassword("matkhau");
	    List authorities = new ArrayList();
        WritePermission writePermission = new WritePermission();
        writePermission.authorize(new WriteRequest());
        authorities.add(writePermission);
        user.setAuthorities(authorities);
        
	    userManager.save(user);
	    serverFactory.setUserManager(userManager);
	    
		ftpServer = serverFactory.createServer();
		ftpServer.start();
	}
	
	public static void shutdownFtpServer() {
		if (ftpServer != null) {
			ftpServer.stop();
			ftpServer = null;
		}
	}
}

 Chú ý:
- Trong Ubuntu, cần trao quyền đọc/viết để test có thể thao tác trên thư mục mà server ftp dùng, chẳng hạn trao quyền cho mọi người dùng trên thư mục "/toan" như sau :

$ chmod -R 777 /toan

- Trong Ubuntu, người dùng không phải là root chỉ có quyền sử dụng các cổng lớn hơn 1024, nên trong các test nên đổi port cho server ftp lớn hơn giá trị này.


MockServer

https://www.mock-server.com/
 

Tải về tại đây http://search.maven.org/remotecontent?filepath=org/mock-server/mockserver-netty/5.11.1/mockserver-netty-5.11.1-jar-with-dependencies.jar


import static org.mockserver.integration.ClientAndServer.startClientAndServer;
import static org.mockserver.model.HttpRequest.request;
import static org.mockserver.model.HttpResponse.response;

import org.mockserver.integration.ClientAndServer;

public class MockHttpServerUtil {
	private static ClientAndServer mockHttpServer;

	public static void setUpMockHttpServer() {
		mockHttpServer = startClientAndServer(5050);
		
		mockHttpServer
		.when(request()
			.withPath("/toan/rootTest/")
		)
		.respond(response()
				.withStatusCode(200));
		
		mockHttpServer
		.when(request()
			.withPath("/toan/rootTest/test.txt")
		)
		.respond(response()
				.withStatusCode(200));

	}
	
	public static void shutdownFtpServer() {
		if (mockHttpServer != null) {
			mockHttpServer.stop();
			mockHttpServer = null;
		}
	}

}

MockServer dùng rất tốt trong việc giả lập các trả lời cho các truy vấn http, tuy nhiên nó không cho phép ta thao tác trực tiếp với hệ thống thư mục vật lý như một server http thực thụ cho phép. Java Lightweight HTTP Server cho phép thực hiện điều này như trình bày bên dưới.


Java Lightweight HTTP Server

https://www.freeutils.net/source/jlhttp/

Tải về tại đây : https://mvnrepository.com/artifact/net.freeutils/jlhttp/2.5


import java.io.File;
import java.io.IOException;

import net.freeutils.httpserver.HTTPServer;
import net.freeutils.httpserver.HTTPServer.ContextHandler;
import net.freeutils.httpserver.HTTPServer.FileContextHandler;
import net.freeutils.httpserver.HTTPServer.Request;
import net.freeutils.httpserver.HTTPServer.Response;
import net.freeutils.httpserver.HTTPServer.VirtualHost;

public class EmbeddedHttpServer {
	private static HTTPServer httpServer;

	public static void setUpFakeHttpServer() throws IOException {
		httpServer = new HTTPServer(5020);
		VirtualHost host = httpServer.getVirtualHost(null);
		httpServer.addVirtualHost(host);
		host.addContext("/toan/rootTest/", new ContextHandler() {
			
			@Override
			public int serve(Request req, Response resp) throws IOException {
		        resp.send(200, "OK");
		        return 0;
		    }
		});
		
		host.addContext("/toan/rootTest/test.txt", new ContextHandler() {
			
			@Override
			public int serve(Request req, Response resp) throws IOException {
		        resp.send(200, "OK");
		        return 0;
		    }
		});
		
		File tempDirectory = new File("/toan/rootTest");
		host.setAllowGeneratedIndex(true);
		host.addContext("/toan/rootTest", new FileContextHandler(tempDirectory));
		
		httpServer.start();
	}
	
	public static void shutdownFtpServer() {
		if (httpServer != null) {
			httpServer.stop();
			httpServer = null;
		}
	}

}


Thứ Ba, 29 tháng 9, 2020

Zip file Java

import java.io.File;
import java.io.FileOutputStream;
import java.io.IOException;
import java.util.zip.ZipEntry;
import java.util.zip.ZipOutputStream;


public class ZipFiles {

	public static void main(String[] args) throws Exception {
    	// zip single file
		String fileContent = "Test zip files";
		String fileName = "Test.txt";
        String zipFileName = "toan.zip"
		zipSingleFile(zipFileName, fileName, fileContent);
        
        // zip many files
        String fileContent1 = "Content file 1";
		String fileContent2 = "Content file 2";
		String zipFileName2 = "manyZip.zip";
		zipFiles(zipFileName2, fileContent1, fileContent2);

	}
    
	public static void zipSingleFile(String zipFileName, String fileName, String fileContent) {
		File file = new File(zipFileName);
		try (ZipOutputStream zos = new ZipOutputStream(new FileOutputStream(file))) {
			ZipEntry zipEntry = new ZipEntry(fileName);
			zos.putNextEntry(zipEntry);

			byte[] data = fileContent.getBytes();
			zos.write(data, 0, data.length);
			zos.closeEntry();

		} catch (IOException e) {
			System.out.println("error while zipping file " + zipFileName);
		}
	}

	public static void zipFiles(String zipFileName, String fileContent1, String fileContent2) {
		File file = new File(zipFileName);
		try (ZipOutputStream zos = new ZipOutputStream(new FileOutputStream(file), StandardCharsets.UTF_8)) {
			zipFileEntry("file1.txt", fileContent1, zos);
			zipFileEntry("file2.txt", fileContent2, zos);
		} catch (IOException e) {
			System.out.println("error while zipping file " + zipFileName);
		}
	}

	public static void zipFileEntry(String fileName, String fileContent, ZipOutputStream zos)
			throws IOException {
		ZipEntry zipEntry = new ZipEntry(fileName);
		zos.putNextEntry(zipEntry);

		byte[] data = fileContent.getBytes("UTF-8");
		zos.write(data, 0, data.length);
		zos.closeEntry();
	}

}


Encode base 64

import java.io.File;
import java.io.FileInputStream;
import java.io.FileNotFoundException;
import java.io.IOException;

import org.apache.commons.codec.binary.Base64;

public class TestUtils {

	public static String encoderBase64(String filePath) {
        String base64File = "";
        File file = new File(filePath);
        try (FileInputStream imageInFile = new FileInputStream(file)) {
            byte fileData[] = new byte[(int) file.length()];
            imageInFile.read(fileData);
            base64File = Base64.encodeBase64String(fileData);
        } catch (FileNotFoundException e) {
            System.out.println("File not found" + e);
        } catch (IOException ioe) {
            System.out.println("Exception while reading the file " + ioe);
        }
        return base64File;
    }

}

Jar : commons-codec-1.6.jar

Phát sinh code Java từ WSDL

Ta có thể dùng lệnh wsimport để tạo ra mã nguồn Java cho dịch vụ web Soap từ một tập tin wsdl như sau :

$ wsimport -keep ToanService.wsdl

Nếu tập tin wsdl phụ thuộc vào một vài tập tin xml(xsd), ta có thể gọi thêm các tập tin ấy khi phát sinh code như sau :
$ wsimport -extension -keep -b Toan1_binding.xml -b Toan2_binding.xml ToanService.wsdl

Chương trình wsimport nằm trong thư mục bin của Java cài đặt trên máy, chẳng hạn :
C:\Java\jdk1.7.0_80\bin\wsimport.exe

Kiểm tra phiên phản của JAX-WS :
$ "C:\Java\jdk1.7.0_80\bin\wsimport.exe" -version

Thông thường với wsimport là ta đủ để phát sinh mã nguồn Java từ một WSDL, tuy nhiên phiên bản mới của wsimport không còn hỗ trợ một vài cấu trúc quá cũ, chẳng hạn như rpc/encoded :
parsing WSDL...
[ERROR] "Use of SOAP Encoding is not supported.
SOAP extension element on line 44 in file ToanService.wsdl has use="encoded" "

Dòng bị báo lỗi có định nghĩa như sau :
<wsdlsoap:body encodingStyle="http://schemas.xmlsoap.org/soap/encoding/" namespace="http://ToanService/" use="encoded"/>

Không còn dịch vụ web hiện đại nào còn dùng đến cấu trúc rpc/encoded cổ lỗ này nữa, giờ đa phần sử dụng document/literal

Tuy nhiên Apache Axis v1 vẫn có thể giúp ta phát sinh code Java cho các dịch vụ web dùng cấu trúc rpc/encoded này nếu cần. Ta phải tải về axis-1.4.jar và các jars mà nó phụ thuộc để phát sinh code Java bằng lệnh sau :

$ java -cp axis-1.4.jar;commons-logging-1.1.jar;jaxrpc-api-1.1.jar;commons-discovery-0.2.jar;saaj-1.1.jar;wsdl4j-1.4.jar;activation-1.1.jar;mail-1.4.jar org.apache.axis.wsdl.WSDL2Java ToanService.wsdl


Khi dùng Apache Axis, có thể gọi client web như sau :
ToanServiceServiceLocator service = new ToanServiceServiceLocator();
ToanServiceSoapBindingStub soapClient = new ToanServiceSoapBindingStub(new URL(service.getToanServiceAddress()), service);
soapClient.getVersion();

Ta có thể xem soap request, response và lỗi trả về nếu có như sau :
String soapRequest = _call.getMessageContext().getRequestMessage().getSOAPPartAsString();
String soapResponse = _call.getMessageContext().getResponseMessage().getSOAPPartAsString();
if (_call.getResponseMessage().getSOAPPart().getEnvelope().getBody().getFault() != null) {
responseFault = _call.getResponseMessage().getSOAPPart().getEnvelope().getBody().getFault().getFaultCode();
}

Thứ Ba, 23 tháng 7, 2019

Cài đặt thủ công Java trên Ubuntu

Trong bài trước ta đã tìm hiểu cách cài đặt Java từ PPA (Personal Package Archive). Tuy nhiên, trong một số trường hợp ta cần cài đặt những phiên bản cũ của Java để thực hiện kiểm thử chẳng hạn. Khi đó, ta cũng có thể cài đặt Java trong Ubuntu bằng cách tải về trực tiếp các gói phiên bản từ trang của Oracle.

Trong bài này tôi sẽ cài đặt gói JDK 8u151 tải về từ trang https://www.oracle.com/technetwork/java/javase/downloads/java-archive-javase8-2177648.html

Các bước thực hiện :

1. Tải gói jdk-8u151-linux-x64.tar.gz về máy

2. Chép gói này vào thư mục /usr/lib/jvm
~$ sudo scp jdk-8u151-linux-x64.tar.gz /usr/lib/jvm/


3. Sau đó vào thư mục /usr/lib/jvm và giải nén gói này
~$ cd /usr/lib/jvm/

xxx/usr/lib/jvm$ sudo tar zxvf jdk-8u151-linux-x64.tar.gz 


4. Gán quyền sở hữu thư mục vừa giải nén cho root
xxx/usr/lib/jvm$ sudo chown -R root: jdk1.8.0_151


5. Thêm phiên bản này vào danh sách Java cài đặt trên máy
xxx/usr/lib/jvm$ sudo update-alternatives --install /usr/bin/java java /usr/lib/jvm/jdk1.8.0_151/jre/bin/java 1061
xxx/usr/lib/jvm$ sudo update-alternatives --install /usr/bin/javac javac /usr/lib/jvm/jdk1.8.0_151/jre/bin/javac 1061 


6. Chọn phiên bản vừa cài đặt với lệnh sau
xxx/usr/lib/jvm$ sudo update-alternatives --config java


There are 5 choices for the alternative java (providing /usr/bin/java).


  Selection    Path                                            Priority   Status

------------------------------------------------------------

  0            /usr/lib/jvm/java-7-openjdk-amd64/jre/bin/java   1071      auto mode

  1            /usr/lib/jvm/java-7-openjdk-amd64/jre/bin/java   1071      manual mode

  2            /usr/lib/jvm/java-7-oracle/jre/bin/java          73        manual mode

* 3            /usr/lib/jvm/java-8-oracle/jre/bin/java          83        manual mode

  4            /usr/lib/jvm/jdk1.8.0_151/jre/bin/java           1061      manual mode

Press enter to keep the current choice[*], or type selection number: 


Sau đó chọn số 4 để dùng phiên bản vừa cài đặt.

7. Tương tự như trên, chọn trình biên dịch javac vừa cài đặt với lệnh sau, rồi chọn phiên bản vừa cài đặt :
xxx/usr/lib/jvm$ sudo update-alternatives --config javac


Thứ Năm, 21 tháng 3, 2019

Nâng cấp lên Java 8 trong Ubuntu 14.04

Trong bài ta sẽ nâng cấp từ Java 1.7 lên Java 1.8 trong Ubuntu 14.04 và cài đặt, cập nhật cấu hình cho Eclipse và Glassfish cũng như cập nhật các tập tin pom.xml để Maven dùng Java 8 biên dịch mã.


A. Nâng cấp từ Java 1.7 lên Java 1.8 trong Ubuntu 14.04

1. Thêm PPA (Personal Package Archive) cho gói Oracle Java 1.8, là gói chính thức của Oracle :

$ sudo add-apt-repository ppa:webupd8team/java

(Nếu không, ta có thể xài gói openjdk như sau :
$ sudo add-apt-repository ppa:openjdk-r/ppa
)

Nếu gặp lỗi :
sudo: add-apt-repository: command not found

thì cài đặt software-properties-common như sau :

$ sudo apt-get install -y software-properties-common


2. Cập nhật thông tin gói trên máy (local package cache) :

$ sudo aptitude update


3. Liệt kê tất cả các phiên bản JDK, JRE, BIN có sẵn :

$ sudo aptitude show oracle-java8-jdk
$ sudo aptitude show oracle-java8-jre
$ sudo aptitude show oracle-java8-bin 


4. Cài đặt Java 8.181-1 :

$ sudo aptitude install oracle-java8-jdk=8.181-1~trusty1 oracle-java8-jre=8.181-1~trusty1 oracle-java8-bin=8.181-1~trusty1


* Ta có thể dùng lệnh apt-get thay vì dùng lệnh aptitude cho các bước 2,3,4 như sau :

$ sudo apt-get update
$ sudo apt-get install oracle-java8-jdk oracle-java8-jre oracle-java8-bin


5. Lưu phiên bản Java mới vừa cài đặt và chuyển sang dùng phiên bản này :

$ sudo update-alternatives --config java
There are 3 choices for the alternative java (providing /usr/bin/java).

  Selection    Path                                            Priority   Status
------------------------------------------------------------
  0            /usr/lib/jvm/java-7-openjdk-amd64/jre/bin/java   1071      auto mode
  1            /usr/lib/jvm/java-7-openjdk-amd64/jre/bin/java   1071      manual mode
* 2            /usr/lib/jvm/java-7-oracle/jre/bin/java          73        manual mode
  3            /usr/lib/jvm/java-8-oracle/jre/bin/java          83        manual mode

Press enter to keep the current choice[*], or type selection number: 3 
update-alternatives: using /usr/lib/jvm/java-8-oracle/jre/bin/java to provide /usr/bin/java (java) in manual mode

Ta chọn số 3 tương ứng với Java 8 vừa cài đặt

6. Tương tự như trên, chọn trình biên dịch javac vừa cài đặt với lệnh sau, rồi chọn phiên bản vừa cài đặt :
xxx/usr/lib/jvm$ sudo update-alternatives --config javac

7. Kiểm tra phiên bản Java được dùng trong Ubuntu :

$ java -version
java version "1.8.0_181"
Java(TM) SE Runtime Environment (build 1.8.0_181-b25)
Java HotSpot(TM) 64-Bit Server VM (build 25.181-b25, mixed mode)

$ javac -version
javac 1.8.0_181

B. Cập nhật các tập tin pom.xml để Maven dùng java 8 cho biên dịch và chạy mã

1. Tìm các tập tin còn sử dụng java 1.7:

$ grep -r --exclude-dir=.svn "<source>1\.7" *
$ grep -r --exclude-dir=.svn "<target>1\.7" * 

2. Thay phiên bản 1.7 bằng 1.8 trong các tập tin pom.xml vừa tìm được :

$ find . -name pom.xml -exec sed -i "s/<source>1\.7/<source>1\.8/g" {} \;
$ find . -name pom.xml -exec sed -i "s/<target>1\.7/<target>1\.8/g" {} \; 

3. Cập nhật cấu hình và biên dịch mã trong dự án để kiểm tra việc biên dịch này chạy không lỗi :

$ mvn eclipse:eclipse
$ mvn clean install -DskipTests


C. Cài đặt và cấu hình dùng Java 8 cho Eclipse

Tôi dùng Eclipse phiên bản Kepler nên cần phải cài một bản vá hỗ trợ cho việc dùng Java 8 cho phiên bản này. Nếu bạn dùng phiên bản Eclipse gần nhất thì Java 8 được hỗ trợ sẵn và không cần phải cài bản vá này.

Tải bản vá Java 8 java8patch-P20140317-1600-repository.zip ở đường dẫn sau :
https://archive.eclipse.org/eclipse/downloads/drops4/P20140317-1600/

Help > Install New Software... > Add, nhấn Archive để chọn tập tin zip vừa tải về

Rồi chọn cài đặt 'Eclipse Java Development Tools'

Sau khi cài đặt xong, cấu hình Eclipse như sau :

Window->Preferences->Java->Installed JREs-> thêm jdk 1.8 và chọn hướng đến thư mục này /usr/lib/jvm/java-8-oracle-1.8.0.181
Sau đó chọn JRE 1.8 vừa thêm vào
       
Window->Preferences->Java->Compiler-> chọn java 1.8

Cuối cùng chấp nhận để Eclipse biên dịch lại toàn bộ mã trong Workspace để thích ứng với phiên bản java 8 vừa chọn sử dụng


D. Cấu hình Glassfish 3.1.2.2 để dùng Java 8

Tôi dùng Glassfish 3.1.2.2 nên cần phải cấu hình như sau :
Cập nhật phiên bản JRE cho Glassfish :

- Trong tập tin glassfishv3.1.2.2/glassfish/config/asenv.conf -> thêm hoặc thay đổi như sau :
AS_JAVA="/usr/lib/jvm/java-8-oracle-1.8.0.181"

- Trong tập tin glassfishv3.1.2.2/glassfish/config/osgi.properties -> thêm vào cuối tập tin:
jre-1.8=${jre-1.7}

Cuối cùng kiểm tra phiên bản Glassfish và phiên bản Java nó sử dụng :

$ asadmin version -v
Version = GlassFish Server Open Source Edition 3.1.2.2 (build 5), JRE version 1.8.0_181
Command version executed successfully.


Thứ Ba, 17 tháng 12, 2013

Ubuntu : Cài đặt Java trong Ubuntu

Bài này giới thiệu cách cài đặt thủ công Java (jdk) trong Ubuntu.

Trước hết cần kiểm xem máy của bạn là 32 hay 64 bit để tải gói jdk thích hợp về cài đặt với lệnh sau :
$ uname -a

Sau đó tải gói jdk tương ứng về máy của bạn, ở đây tôi tải jdk-6u37-linux-x64.bin (cho 64 bit) (hay jdk-6u37-linux-i586.bin cho 32 bit) tại đường dẫn sau http://www.oracle.com/technetwork/java/javase/downloads/jdk6u37-downloads-1859587.html

Chép tập tin tải về (trong thư mục Downloads tại Home) vào thư mục /usr/lib/jvm bằng tài khoản root (sudo)
$ sudo cp Downloads/jdk-6u37-linux-x64.bin /usr/lib/jvm/

Vào thư mục /usr/lib/jvm/
$ cd /usr/lib/jvm/

rồi gán quyền thực thi cho tập tin với lệnh chmod như sau
$ sudo chmod u+x jdk-6u37-linux-i586.bin

Sau đó ta có thể gọi thực thi tập tin này
$ sudo ./jdk-6u37-linux-i586.bin

lệnh này sẽ tạo thư mục /usr/lib/jvm/jdk1.6.0_37 chứa jdk cài đặt
Xoá đường dẫn tượng trưng (symbolic link) /usr/lib/jvm/java-6-sun nếu có. Rồi tạo đường dẫn tượng trưng mới đến thư mục vừa cài đặt jdk
$ sudo ln -s /usr/lib/jvm/jdk1.6.0_37 /usr/lib/jvm/java-6-sun 

Mở tập tin .profile; <user name> ở đây là tên thư mục gốc của người dùng
$ gedit /home/<user name>/.profile


Rồi thêm biến JAVA_HOME bằng cách thêm vào cuối tập tin này nội dung sau :
# Java
export JAVA_HOME="/usr/lib/jvm/java-6-sun"
export PATH="$JAVA_HOME/bin:$PATH"


Trong /home/<user name> gọi thực thi tập tin .profile như sau
$ . .profile

Kiểm tra phiên bản java vừa cài đặt bằng cách gõ lệnh sau
$ java -version


Tôi có kết quả như sau
java version "1.6.0_37"
Java(TM) SE Runtime Environment (build 1.6.0_37-b06)
Java HotSpot(TM) 64-Bit Server VM (build 20.12-b01, mixed mode)


Trong trường hợp gõ lệnh này mà thấy lỗi, nên kiểm tra biến môi trường JAVA_HOME có được định nghĩa chính xác hay không với lệnh : 
$ export


Một khi cài đặt xong xuôi, xoá tập tin jdk-6u37-linux-i586.bin
$ sudo rm jdk-6u37-linux-x64.bin


Thứ Năm, 2 tháng 5, 2013

Java : Ví dụ JSP chứng thực (authentication)

Trong thực hành khi viết một ứng dụng web bằng JSP ta thường sử dụng servlet cho phần xử lý và trang JSP cho phần trình bày (giao diện). Ví dụ dưới đây chỉ mang tính chất giới thiệu JSP, vì tất cả phần trình bày và xử lý đều được viết bằng JSP tuy có phân biệt trang JSP cho trình bày và trang JSP cho xử lý, vì suy cho cùng JSP cũng là servlet và mọi việc ta có thể làm với servlet thì ta đều có thể làm với JSP. Như đã nói, cách viết phần xử lý dùng JSP không nên áp dụng trong thực tiễn khi viết ứng dụng web.

Dưới đây ta sẽ xây dựng một ứng dụng web cho phép chứng thực người dùng. Ứng dụng này chỉ đơn giản cho phép người dùng đăng nhập và đăng xuất. Ngoài ra nó còn có thêm phần quản lý truy nhập tuỳ theo vai trò người dùng.

Ta xây dựng một thư mục dự án như sau :

Thứ Ba, 30 tháng 4, 2013

Java : Giới thiệu JSP (JavaServer Pages)

1. JSP là gì?

JSP là một công nghệ cho phép thực hiện dễ dàng việc viết các trang web động (dĩ nhiên ta cũng có thể viết các trang web tĩnh với JSP). Cụ thể, một trang JSP là một trang HTML (hay XML) trong đó có trộn lẫn các mã Java, tức các thành phần JSP, cho phép thực hiện nội dung động. Các trang JSP có phần mở rộng .jsp. Một trang jsp có thể là một bao gồm nhiều tập tin, mà các tập tin này có thể là một trang jsp hoàn chỉnh hay những đoạn (fragment) của một trang jsp. Những đoạn jsp này có phần mở rộng là .jspf

Như ta đã biết, việc viết nội dung html trả lời trong servlet bằng cách dùng các lệnh out.println() là một việc tốn nhiều công sức, đặc biệt khi nội dung html trả lời càng phức tạp. Việc này còn tệ hơn khi ta muốn bảo trì hay thay đổi nội dung trả lời. JSP đem lại một giải pháp tiện lợi hơn khi cho phép chèn nội dung động vào trang web, nó còn cho phép việc tách bạch phần trình bày và logic xử lý nội dung. Với servlet thì ta chèn mã html để phát sinh trong lớp java còn JSP thì ngược lại, ta chèn mã java trong trang html.

Thứ Tư, 24 tháng 4, 2013

Java : Ví dụ Servlet chứng thực 2 (authentication) cấu hình bằng web.xml

Trong bài này ta dùng lại Servlet chứng thực người dùng của bài trước nhưng chỉ khác ở chỗ là ta sẽ cấu hình để ánh xạ servlet bằng tập tin cấu hình web.xml thay vì dùng dẫn giải (annotation)

Tạo thư mục dự án như sau :
Ta dùng lại lớp AuthenticationServlet của bài trước nhưng loại bỏ dẫn giải @WebServlet("/logon")

Thứ Ba, 23 tháng 4, 2013

Java Servlet : Giới thiệu

1. Java Servlet là gì?

Với mục đích tương tự như Java Applet, Java Servlet nhằm cung cấp nội dung động đến người dùng; nhưng trái với các applet chạy ở phía khách (trên trình duyệt web chẳng hạn), các servlet là những môđun mã Java chạy trên máy chủ web (server web). Về mặt từ ngữ applet có nghĩa là ứng dụng nhỏ (bắt nguồn từ từ application với hậu tố -et hàm nghĩa là nhỏ), hiểu theo nghĩa tương tự servlet cũng là ứng dụng nhỏ chạy trên máy chủ (ghép của server và applet). Servlet không gắn chặt với một giao thức khách-chủ đặc thù nào cả, nhưng vì hầu như thường được dùng với giao thức HTTP nên từ Servlet thường được hiểu với nghĩa HTTP Servlet.

Một servlet được thực thi động trên máy chủ và cho phép mở rộng thêm chức năng cho máy chủ này như : xử lý/lưu dữ liệu gởi từ mẫu HTML (HTML form), cung cấp dữ liệu động qua việc lấy thông tin thông qua kết nối với cơ sở dữ liệu, thực hiện giao dịch thương mại điện tử ...

Thứ Tư, 5 tháng 12, 2012

Java : Xài dịch vụ Web dạng REST với Client API của Jersey

Trong bài "Tạo dịch vụ Web dạng REST (JAX-RS)" ta đã tạo và đăng (publish) dịch vụ Web ở phía máy chủ (server). Bài này ta sẽ tạo một ứng dụng phần máy khách (client) để tiêu thụ dịch vụ Web này.
Ta tải về máy thư viện Jersey tại http://jersey.java.net/.
Tạo một thư mục dự án như sau :

Như ta thấy ở hình trên, trong ứng dụng khách này ta sử dụng hai tập tin jar jersey-client và jersey-core của thư viện Jersey vừa tải về.
Ta dùng JAXB để phát sinh lớp MobilePhones từ tập tin "mobile phone.xsd". Xem chi tiết tại đây.

Thứ Ba, 4 tháng 12, 2012

Java : Tạo dịch vụ Web dạng REST (JAX-RS)

Trong bài này ta sẽ tạo dịch vụ Web dạng REST (Representational State Transfer). Trước tiên ta sẽ tải về thư viện jersey tại http://jersey.java.net/.

Ta tạo thư mục dự án (project) như sau :

Trong thư mục dự án, ta tạo thư mục webapp. Trong đó, tạo thư mục WEB-INF chứa một thư mục con lib và tập tin web.xml. Thư mục WEB-INF được quy ước khi ta tạo ứng dụng Web với Java, trong đó thư mục lib quy ước chứa các thư viện dùng trong ứng dụng Web và tập tin web.xml dùng để cấu hình ứng dụng này.

Ta giải nén thư viện Jersey vừa tải về và chép toàn bộ các tập tin jar trong đó vào thư mục lib trong WEB-INF.

Thứ Sáu, 30 tháng 11, 2012

Java : Kiểm thử phần mềm với JUnit và phát sinh báo cáo kiểm thử bằng Ant

Trong các bài xử lý tập tin XML với DOM, JDOM, JAXB và xử lý chuỗi, ta dùng dẫn giải (annotation) @Test cho các hàm để dùng chúng như các kiểm thử đơn vị (unit test). Thực ra các hàm này minh hoạ cách xử lý XML, chỉ có duy nhất dòng lệnh Assert.assertEquals() thực hiện việc kiểm thử đơn vị. Cứ giả dụ đấy là các kiểm thử đơn vị, trong bài này ta sẽ dùng Ant để thực thi một lèo những kiểm thử đơn vị này và sau đó phát sinh báo cáo cho chúng.
Trước tiên ta tải JUnit tại đây và lưu nó trong thư mục lib.

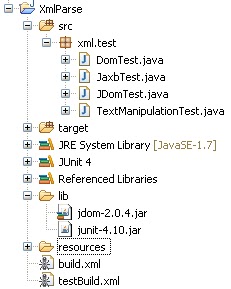
Thư mục dự án (project) trong Eclipse có cấu trúc sau:

Nội dung tập tin Ant testBuild.xml :

Thứ Tư, 28 tháng 11, 2012

Java : Xử lý tập tin Xml bằng cách xử lý chuỗi

Trong Java, ngoài việc sử dụng các thư viện, ta cũng có thể đọc và xử lý tập tin Xml bằng cách thao tác trên chuỗi ký tự.
Nội dung tập tin Xml "mobile phone.xml" cần đọc xem tại đây.

Nội dung mã trong tập tin TextManipulationTest.java

Java : Xử lý tập tin Xml dùng JAXB

Trong Java, tùy theo nhu cầu và mục đích xử lý tập tin Xml, ta có nhiều lựa chọn. Dưới đây, ta dùng JAXB (viết tắt của Java Architecture for XML Binding) để đọc, viết, sửa, thêm nốt (node) con.
Nội dung tập tin Xml "mobile phone.xml" cần đọc xem tại đây.

JAXB thường được dùng trong trao đổi thông tin giữa các dịch vụ web (Web Service). Dùng JAXB thì ta cần biết đến hai khái niệm Marshalling (hay cũng gọi Serialization) và Unmarshalling (hay còn gọi Deserialization) mà ở đây tôi dịch một cách hình tượng tương ứng là Chuyển xẹp và Chuyển phồng:
- Chuyển xẹp (marshal/serialize): là quá trình chuyển một trạng thái thông tin trong bô nhớ - một cấu trúc dữ liệu (data structure) hay một đối tượng (object) chẳng hạn - sang một dạng thức thông tin nhỏ hơn tức một chuỗi các bit, các byte hay tập tin để có thể lưu trữ hoặc truyền đi.
- Chuyển phồng (unmarshal/deserialize) : là quá trình ngược của chuyển xẹp, nhằm rút ra một cấu trúc dữ liệu hay đối tượng từ một chuỗi các bit, byte hay từ một tập tin.